Showing posts with label DIY. Show all posts

September 29, 2015

DIY Black Soap & Tea Tree Face Cleanser


I used to have terrible acne. It wasn’t until well into my 20s that my skin issues were under control. Fortunately my skin and hair have been doing really well for a while now and I attribute that to using mostly natural products.

Black soap has been an amazing product for cleansing my whole body really, however it’s a pain to use on my body in a white shower so I mostly use it for my face and sometimes my hair. I use a lot of hearty oils all over my body and I wear makeup most days. I love black soap because it leaves you squeaky clean, but not so stripped that your skin feels dry.



Tea tree oil is known for its healing antiseptic properties and anti-inflammatory properties that reduce itching and clears rashes over time. I always add some to my shampoo, which has helped my scalp enormously.

Aloe Vera is extremely beneficial for your body inside and out. Externally it can be used to help ease the discomfort of sunburns, minor wounds, cuts, scrapes and rashes, and is very moisturizing.

I have used just plain black soap and that works really well, but I happened to have these ingredients in my house. I use this wash after removing my makeup with banila co. clean it zero (the best makeup remover I’ve ever used) and my skin looks and feels refreshed and clean.


What you’ll need
  • Raw Organic Black Soap (solid)
  • Tea Tree Oil (Optional)
  • Aloe Vera Juice (Optional)
  • Castile soap (Optional)
  • Water
  • Bottle
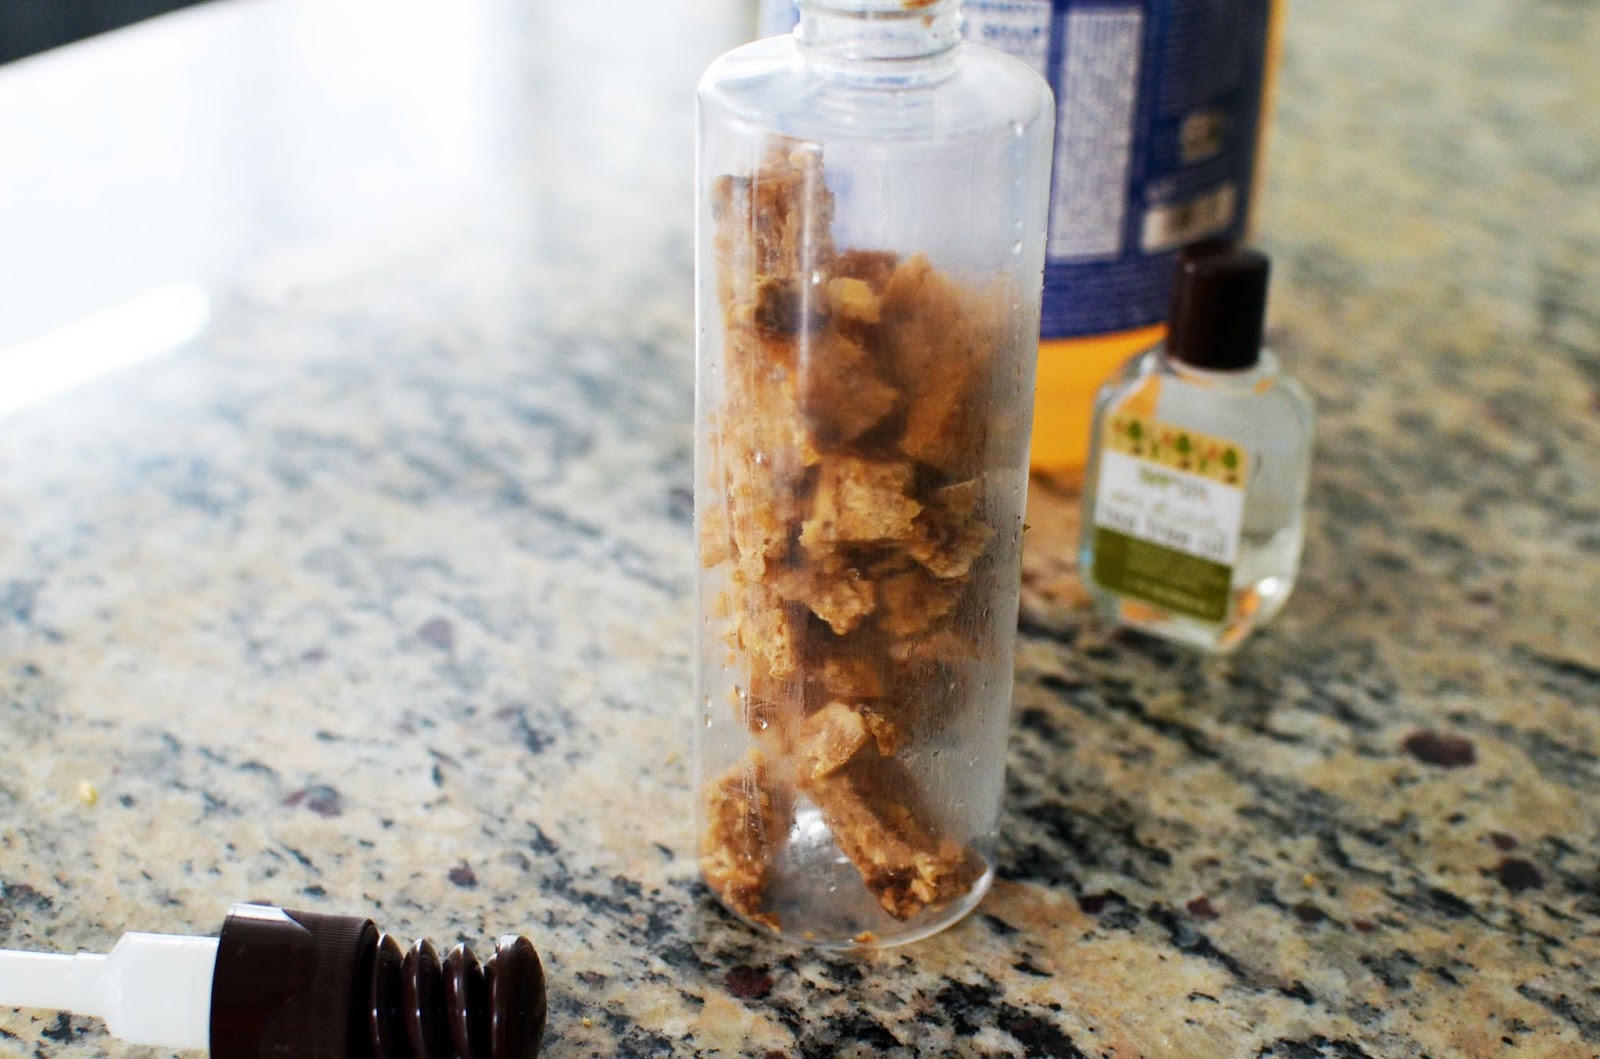
I filled the bottle with chunks of the black soap (about 1/2 cup). Added about a teaspoon of tea tree oil. Added a few table spoons of Aloe Vera juice, a thin layer of Castile soap, and filled the rest with water. It takes about a day for the black soap to melt and become completely liquid. I recommend using a pump or a container with a thin nozzle for easy use and if you have sensitive skin, leave out the Castile soap and go easy on the tea tree.


July 1, 2015

Wasted Watermelon Popsicles


I’ve been drinking, watermelon…if it tasted like these popsicles then…never mind…

Little known fact. I’m pretty obsessed with popsicles. Especially if they have chunks of fruit, yes, gimme. I feel like watermelon is a bbq staple and so is booze so why not mix the two together.


Here’s what I used.

  • Half of a small watermelon blended – I only ended up using about a quarter, but if you are a real person with real Popsicle molds then you will need more than me
  • Leaves of 4 springs of thyme
  • Simple syrup – to taste
  • 2 shots of Green Hat Navy Strength Gin
  • 3 shots of Vermouth
  • Juice of 2 limes – again…taste, I like the tangy tartness

Herbed Simple Syrup

  • ½ cup honey
  • ½ cup sugar
  • 1-cup water
  • 5 leaves of sage
  • 2 sprigs of thyme
  • 2 sprigs of lavender

Note: This recipe is very fluid; feel free to use your own measurements to suit your taste.

Simple Syrup
Add the water and all other ingredients to a small saucepan. Let it simmer, stirring until the honey and the sugar dissolve and let simmer some more so that the herb flavor is infused, stirring periodically. I kept it on low for about 20 mins.


Popsicles
Chop up the watermelon and blend to your desired smoothness, you can keep some chunks in there if you like.

Add simple syrup to taste. I would recommend adding a bit more to account for the freezing.

Add the thyme leaves, vermouth and gin one shot at a time, testing each time to make sure you like the flavor, I like my mixture very skrong strong.


Pour into molds and freeze. Serve with vino verde or champ. Have more than one!

Note: trader Joe’s sells the best vino verde.

June 8, 2015

How to Plant an Urban Garden


I wish I could grow everything that I eat. In due time! I have no outdoor space so for now I am determined to use my space as efficiently as possible. I’m starting with the double door Juliet balcony in my kitchen along with the space just below it. If i need more space then I will move to the balcony in my bedroom. Here’s what I have planted now.

February 11, 2015

Home Update | Living Area, Kitchen Island


My oh my how a coat of paint can transform a place, whew! So I’m a little undecided. I knew that for the main color in my living area I wanted a very light close to white color to brighten up the room. The previous color was this flat matte beigey color with a pink hue, sort of like salmon and it needed to be updated desperately. I am still working out what other two colors I am going to use for accents, because this space definitely needs to be broken up a bit with wall color. I’ll work on that later.

Now I feel good enough about it to mount the tv and begin to hang my art up on the walls. I have to admit when I first moved into my condo I was afraid to put anything in the walls. I didn't want to ruin anything. Ha! I’m hella over that now and I’ve been diving in

I will most likely paint the island a different color but for now it is the base color that I used for the rest of the walls. I’ve been stalking lots of cool geometric, black and white designs/shapes online with the intention of either painting the island or one of my bathroom walls with a pattern.

Recently I was put on to washi tape by jewelery designer Rachel Stewart and figured this would be a much better alternative while I work out what I really want to do with all the walls.


I also added bar hooks that I picked up at home depot for about $3 for a pack of two. It’s such a cute little accent and my place it small so it is a great space saving solution for when I have my girls over.

Small space solution: Add bar hooks to your kitchen island.

This whole update was super cheap. I may of may not be using every bit of restraint I have not to washi every damn wall! The best part is that I can change it without too much fuss.

Hooray for my my new island. :)

February 2, 2015

One Mo’ Gin: DIY D’angelo Inspired Bar Light


Pour yourself a drink and listen to this.

D’angelo’s lyrics always manage to capture small but significant romantic details. THIS is what I love most about his music. I thought a small bar light would be a great detail to make the bar shelf into more of an bar area and tie it into the rest of the decor.


I’ve been researching how to make a bar light to accompany my the shelf. All the tutorials were much too involved. So I came up with a simpler solution, and honestly this meshes much better with the rest of the room.

I was sitting at work when the idea to make this sign hit me. An homage to one of my favorite artists and one of my favorite spirits. One day I may get this made into a real neon light sign, but for now this is giving me everything I need.


What you’ll need
I used painters tape to make sure that the letters were aligned. And cut the tail of the “Z” to make the apostrophe.


I used the metal clamps on the back of the frame to secure the lights onto the frame. They can also be glued for a more permanent solutions.


And that’s it!

January 26, 2015

Vintage Bar Shelf Redone


I thrifted this amazing shelf from Salvation Army for less than $30. I’m assuming its vintage based off of the tacky paint splatter finish that it had, which I thought I’d immediately change but it grew on me when I took it home. I’m kind of averse to adding wall shelves because I don’t want my small condo looking too cluttered. My intention was to buy/diy a bar cart but when I laid my eyes on this shelf my plans changed!


The reason why I decided to change it, is because I spilled a white paint sample all over it, my floors and the wall. Good times…


Since it was ruined I had to paint it.

I sanded all the outside edges to get rid of as much of the texture from that paint splatter looking finish and gave it a good cleaning with a soapy damp cloth.

After two coats of primer I was satisfied with the results.


I painted the inside with liquid gold paint and the outside with a high gloss black paint.

Side note: this color scheme would look stunning on a bar cart and goes well with most decor. 


all done!


I wanted it to feel a little bit masculine. I want to add more neutral/masculine pieces to give the room balance. This shelf also acts and a little bit of a divider for the dinning room/kitchen and the living room. I plan to reinforce that with the paint when I get to it!

I added clear sticky dots onto the glass so that there is a barrier between the metal and the shelves.


I like to add a plant element to every room. This place is going to look like a freaking jungle by the time I move out. And I am totally with that.

#barshelf > #barcart

January 12, 2015

DIY Gold Fish-scale Wall Art


Now that I’ve got most of my place painted, I’m spending time on the smaller details of the decor. I am obsessed with adding texture to each room in subtle and not so subtle ways.

For my bedroom I choose a jewel tone palette and I want the vibe to be rich and sexy in color, texture and overall vibe. I’ve done this by mixing modern and natural accents and lots of saturated fabrics both solid and patterns.

This scaled piece has been on my list for a while now. I’ve had several ideas on how I want it to look. I considered making it a headboard, doing a trio of square pieces, etc. but when I saw this frame in salvation army I knew that I wanted to use it for this project.

I saw the original project on pinterest, which uses slightly different materials. I used what I had.

I highly recommend buying a circle cutter for this project versus hand cutting the circles. You really want them to be precise and it will go by much faster.


What you’ll need
  • A frame or plywood
  • Circle cutter 
  • Glue gun
  • Craft paper
  • Poster paper
  • Tape
  • Spray paint
How it’s done
I bought bunch of poster board from the dollar store and used the circle cutter to make 4” circles. You can make them big or small, I think smaller circles look much better.

Then I covered the frame with craft paper. I may want to use it for something else later.

Draw out or use tape to create straight lines across the frame.


Use a glue gun to place the circles on the frame starting at the bottom.

Once it is covered leave it overnight to dry.

When it’s completely dry flip it over and cut the round edges off.

Glue the edges done.

In a well ventilated area spray paint the frame. Now, you can use any color you want to match your decor.

This is a fairly simple project, cutting the circles was the most time consuming part.

I’m in love with the finish product. It is just perfect for the tone that I’m setting in my bedroom.

Tips
  • Use poster paper! If you use a thinner weight then the circles are more likely to crease.
  • Make sure you get under the circles you don't want any white parts showing. 
  • Ask a friend to help you hang it. My frame is currently a bit crooked, hanging a frame of this size is definitely a two person job!


December 23, 2014

DIY Holiday Gift Ideas


Its crunch time people! And I have several super simple DIY gift ideas for the holidays.


Infused Liquor Set
I already have a post about infusing liquor here. The bottles are from ikea, you can also get them from Target or Walmart on the cheap.

What you’ll need:
  • Glass bottles.
  • Alcohol: don’t buy anything too expensive.
  • Flavor ideas: orange, chocolate, vanilla, dried candied pineapple, dried candied ginger.
Tips:
  • Boil the bottles to sanitize.
  • Go light on the sugar you can always add more. Measurements do not have to be exact.
  • The contents should be shaken and tasted weekly.


Cigar Box
I bought a plain wood box from Joann’s Fabrics and painted it with a leftover paint sample that I had in my house. I also bought a clear spray paint gloss from Home Depot to give it a glossy finish.

Super size this gift by adding:
  • Cigars
  • A bottle of wine or cognac
  • Gift card to cigar shop


Infused Oil Set
I always have a set in my kitchen. It is an easy way to layer flavor in dishes like omelets, stir-fry and homemade salad dressings.

What you’ll need:
  • Olive oil
  • Flavor ideas: Garlic, Herbs: Rosemary, Thyme, Sage
After you sanitize the bottles, pour the olive oil into the container to measure how much you’ll need. Add the flavor component(s) and let the oil come to a boil. Turn the heat down and simmer the oil for as long as possible. Let it cool down and add it to the bottles.


Infused Honey
It is cold and flu season so this is a perfect option! There are two ways infuse here. The first is by using a double boiler and adding the flavor components, is to add the flavor components to the honey and let it infuse over time.

What you’ll need:
  • Glass Jars
  • Honey
  • Flavor: Sage, lemon bomb, citrus (zest/peel), ginger


Sage Simple Syrup

Equal parts water and sugar plus a flavor component and voila! My favorite is sage simple syrup, which I love to put in my coffee. Yeah I know sounds real but it’s magically delicious.

You know the drill, glass bottles, twine, pretty package, hooray!


Anywho! Happy Holidays and Happy New Year! xoxo

October 22, 2014

DIY Wall Art: Gold Foil

I've REALLY been into metallic tones lately. Gold, silver and bronze accents add richness while remaining neutral. My bedroom will have many more gold accents but for starters I've added a pop of gold with this easy gold foil diy.


You will need:
  • About a foot long piece of foil. Start bigger you can always rip it to make it smaller.
  • Gold spray paint
  • Picture frame

 
Take your foot long piece of foil and crumple it to add texture. 

Carefully un-crumple and spray paint gold. Glue it or tape it down to the background that comes with your frame and voila! 

You can make it into a heart, circle or any shape if you want something that looks a bit more intentional. Simply cut the foil before spray painting.

I plan on hanging this on the wall once I have a few more items to put up, of course I will update you all along the way!


Related Posts Plugin for WordPress, Blogger...